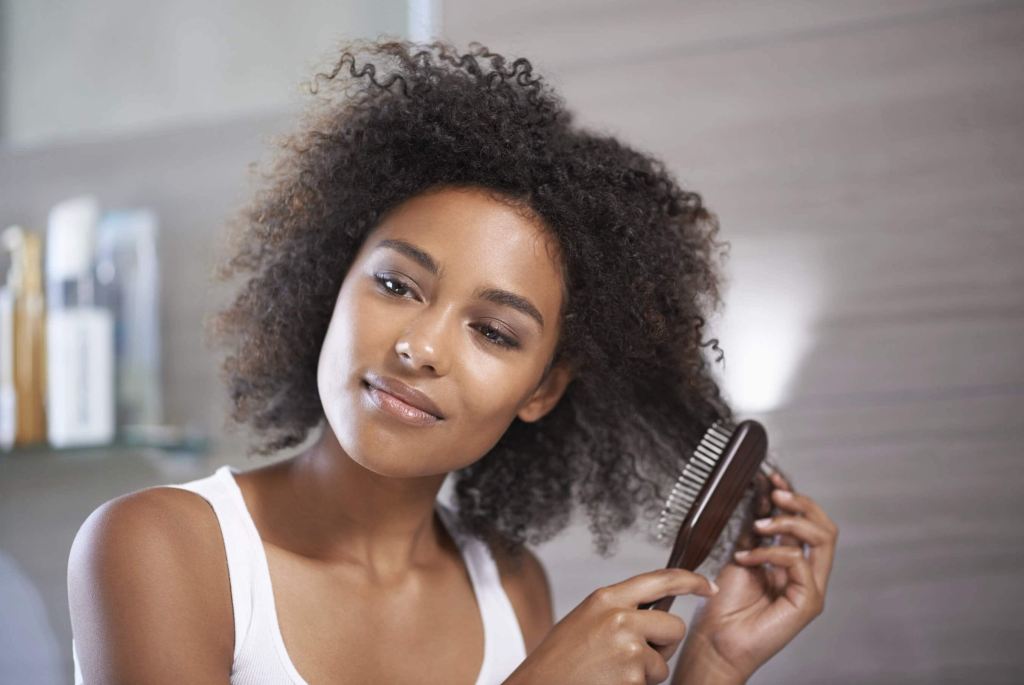
Sometimes it is difficult to find a longlasting edge control gel that will keep your frontal hairs flat for a longer time. Oh yes! It may be challenging to find one but if you found yourself reading this, then God just answered your prayer because we’re about to dive deeper.
In this writeup, I will recommend some of the best edge control gel brands that work effectively in laying your edges flat for as long as a whole day without flaking or wearing off. Remember that these brands can be found in almost all shops or online. So let’s get right into it.
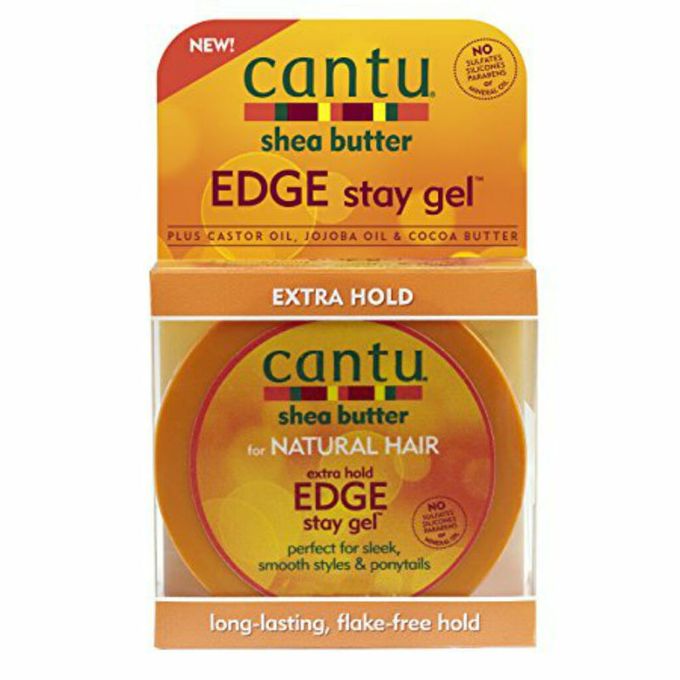
The first is Cantu Edge Control
This product really works best on extremely coarse hair. So those of you with ‘hard’ textured hair may try this. It contains shea butter which also adds some shine to your edges and provides a neat sleek. Cantu never dissapoints, so yeah, you’ve gotta give it a try and thank me later. You can get it on Jumia, but it may be more expensive.
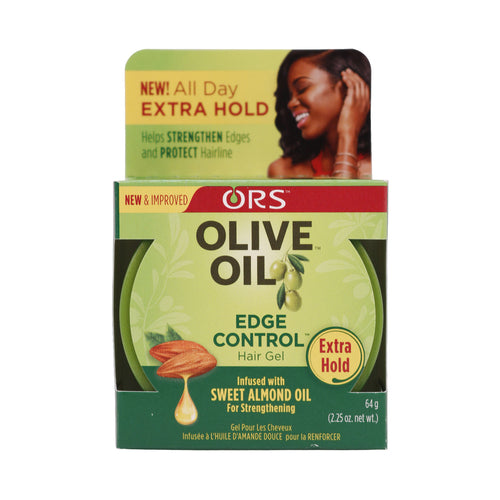
The next is the Olive Edge Control
This product also works well on hard natural hair. It does not flake as well and can last for the whole day. Personally, this is my go-to gel. I really admire how perfectly it sleeks back my edges, especially when I use the edge brush. And it smells really good! You should try it.
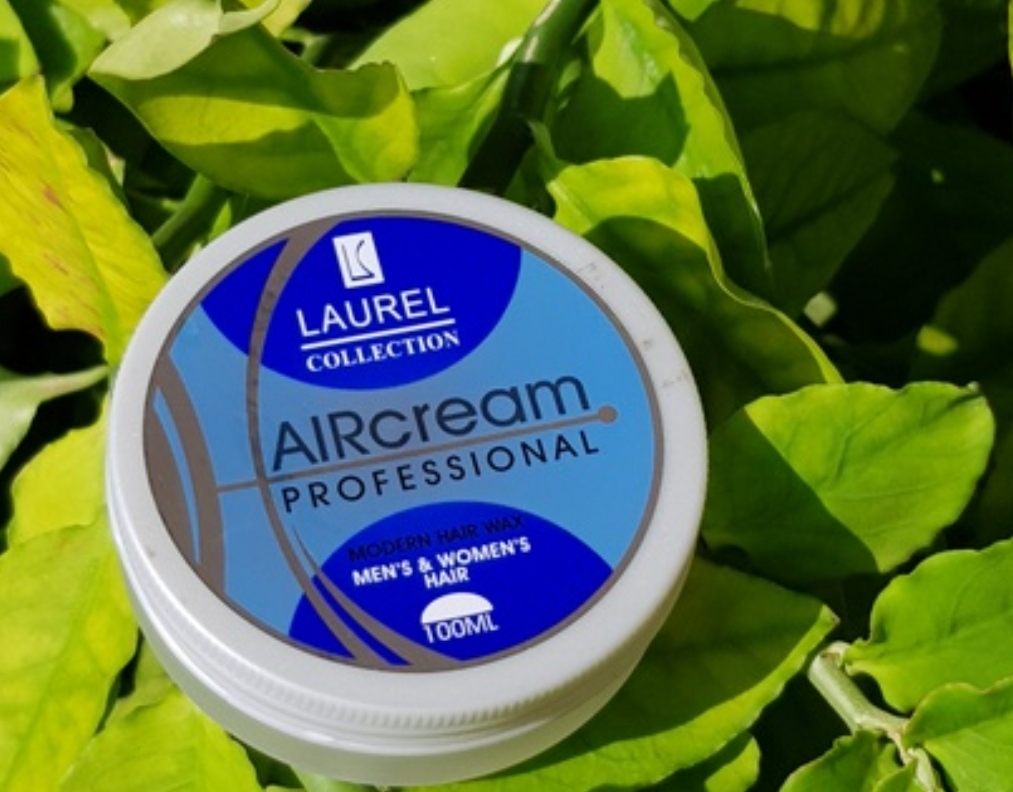
The next gel I will recommend is the Laurel Aircream.
This cream has a unique consistency and can lay fine edges for you. It also has a stronghold and is also good for laying flat hair strands that don’t stay in place(fly-aways) when styling your hair. Eg. Ponytail, sleek back hairstyles, etc. Note that you must use an actual edge brush to see better results, when using this product.
The last product I recommend is the Shine ‘n’ Jam Edge hold.
This product has such firm hold and can last for as long as you need. It is a conditioning gel and does not harden your edges but keeps them moist, flat and beautiful.
Your Edges really add up to your beauty, and you should take good care of’ em. Uh-huh! One way to look ‘bougie’ is to always have your Edges intact.
I hope this writeup helps with your natural hair journey. Journey with us and we’ll provide you with the best natural hair tips you may not find elsewhere.
CurlyNaturalsCommunityWrites.
In case you want to have direct contact with us, join our page and send us a dm.
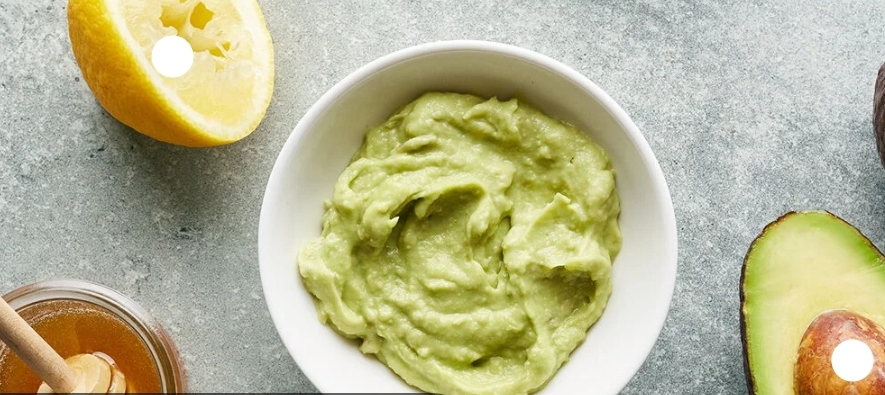
1 ripe avocado 2 tablespoons of plain yogurt 2 tablespoons of honey 1 tablespoon of olive oil or coconut oil or jojoba oil or amla oil
2 tablespoons of hair conditioner
Instructions:
Start by mashing the avocado in a bowl until it becomes smooth and lump-free.
Add the plain yogurt, honey, conditioner and olive oil to the mashed avocado. Mix well until all the ingredients are thoroughly combined.
Apply the mixture to your clean, damp hair, starting from the roots and working your way to the ends. Make sure to distribute the mixture evenly.
Once your hair is completely coated with the protein treatment, cover it with a shower cap or plastic wrap to create a warm and moist environment.
Leave the treatment on for about 30 minutes to an hour to allow the proteins to penetrate your hair shaft and nourish your strands.
After the desired time has passed, rinse your hair thoroughly with lukewarm water to remove the protein treatment.
Follow up with a moisturizing conditioner to restore moisture and balance to your hair.
This protein treatment can help strengthen and nourish your natural hair, as well as promote elasticity and prevent breakage.
Remember to perform this treatment once every two to four weeks, depending on the condition of your hair.
It’s important to maintain a balance between protein and moisture, so make sure to follow up with regular moisturizing treatments and deep conditioning sessions as well.
NB: For easy manipulation, keep your hair in twists before and during the application of the mask. Also note that this treatment is mostly effective when done after your hair is freshly washed.
If you are experiencing a lot of knots in your hair and find it difficult to wash or comb your hair yourself, here are some tips that may help you:
Use a detangling spray or conditioner: Applying a detangling spray or conditioner before combing your hair can help loosen knots and make it easier to manage.
Section your hair: If your hair is very thick and prone to tangling, consider sectioning it into smaller parts before washing or combing. This can make the process easier and less painful. Personally, I section my hair into large twists and wash it as it is and this prevents the hair strands from tangling and rubbing against each other. You can begin by conditioning your hair, then follow with the large twist, then wash the hair. You’ll thank me later!
Use a wide-tooth comb: A wide-tooth comb is gentler on the hair and less likely to cause breakage or further tangling. Start combing from the ends of your hair and work your way up to the tip of your hair.
Be gentle: Coarse hair can be fragile, so it’s important to be gentle when washing and combing. Avoid pulling or tugging at your hair, which can cause breakage and further knots. If you’re not in a good mood, don’t involve your hair!
Try a protective style: Protective styles like braids or twists can help reduce the risk of tangling and make it easier to manage your hair. Be sure to choose a style that doesn’t put too much tension on your hair, which can also cause breakage.
Remember, it’s important to be patient with your hair and find what works best for you. With time and practice, you’ll become more comfortable managing your natural hair. Natural hair has never been easy, but that is why CNC has availed itself to assist all naturals all over the world to have an easy journey with their hair.
Stick with us on this journey and let us be your guide to your natural hair ish!
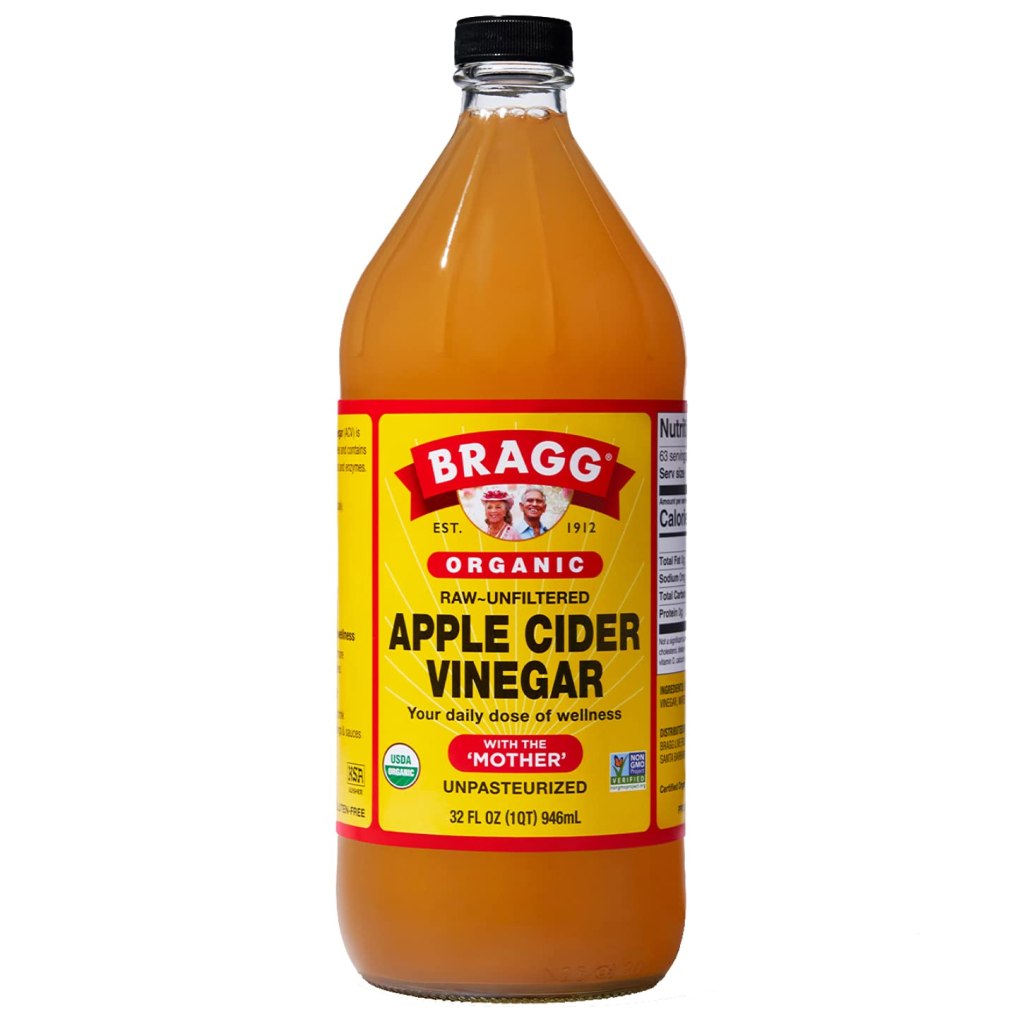
Apple Cider Vinegar(ACV) is popularly known by the natural hair community for its beneficial properties to both the body and hair.
In this article, you’ll know what ACV is , its benefits in terms of the natural hair, the pros and cons of it, how it’s made (for the benefit of those who want to save some coins) and various ways to apply or use it on your hair.
Apple cider vinegar is simply the fermented form of apple juice. It has acetic acid and nutrients such as vitamins B and C. ACV is also used widely and traditionally for medicinal purposes.
Apple cider vinegar is mostly apple juice, but adding yeast turns the sugar in the juice into alcohol. This is a process called fermentation. Bacteria turn the alcohol into acetic acid and that is what gives vinegar its sour taste and strong smell.
Uses/Purposes Of ACV
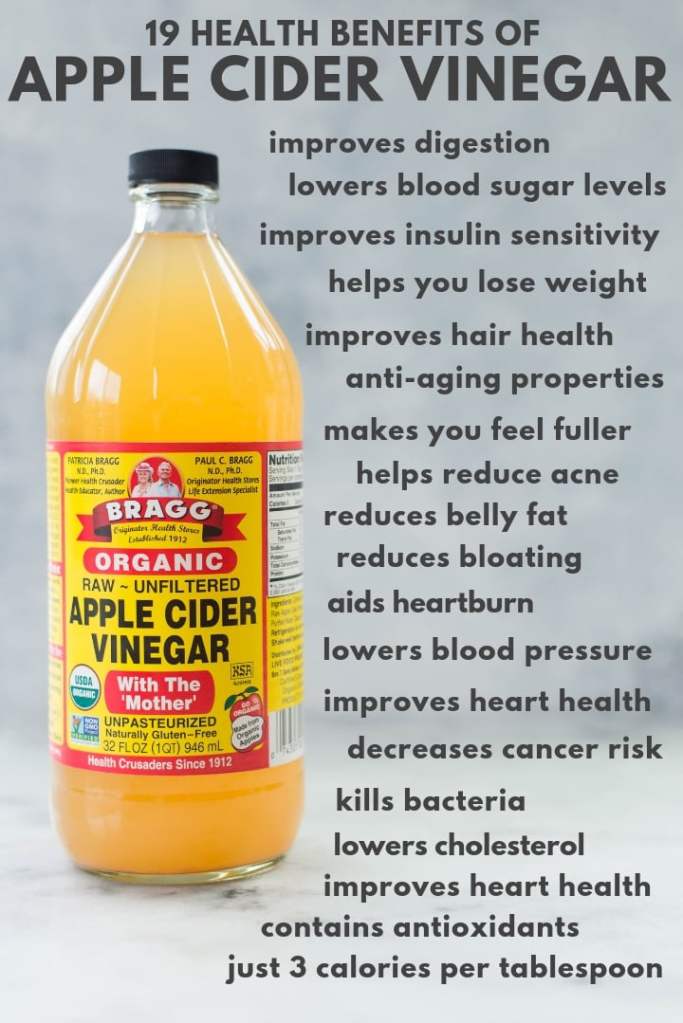
ACV improves heart function, aids weight loss, reduces belly fat, regulates blood sugar, improves hair, clears acne, etc.
To stick to our main purpose of this article, we will focus mainly on how ACV is beneficial to our natural hair journey. Simply put, how ACV aids and improves our hair health.
Why is ACV important in my natural hair journey?
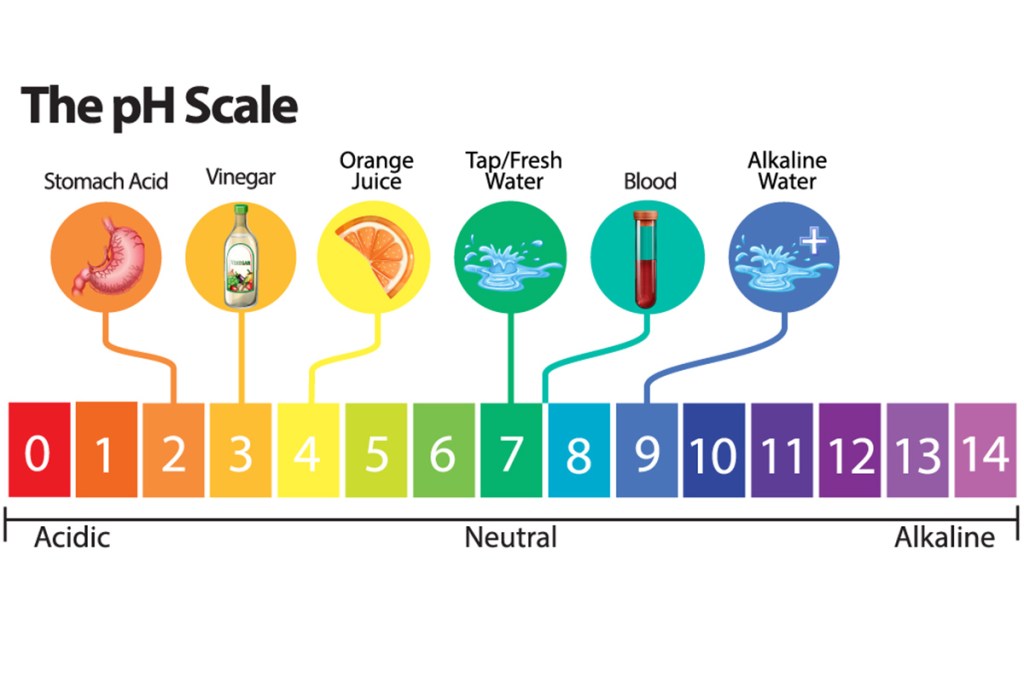
To begin with, ACV balances the pH of the hair and scalp. ACV works on the hair cuticles by flattening and closing them. When the cuticles of the hair are flattened and closed, it prevents the hair strands from rubbing against each other and tangling. This aids in easier detangling of the natural hair and due to the smooth cuticle layers. Due to its high acetic-acid content, ACV balances pH by lowering the alkalinity of the hair. This ensures strength and shine of the hair.
NB: pH is a measure of acidity, with 1 being the most acidic and 7 being neutral. ACV has a low pH of about 2 to3 (considered mildly acidic) which massively helps in balancing the hair or scalp or both.
ACV also prevents frizz and breakage. We learnt, in the previous paragraph, that ACV flattens and closes the hair cuticles. Due to this, the hair strands do not break by rubbing against each other. The hair strands also become stronger and there’s a limited chance of frizz due to the smoothness of the hair strands.
Moreover, apple cider vinegar prevents and kills bacteria and fungi on the scalp. ACV is widely effective as an antifungal, disinfectant and is also mildly acidic, thus, these properties of ACV is suggested to prevent or kill bacteria or fungi which could contribute to a lot of scalp issues such as dandruff, scalp folliculitis, itching of the scalp, etc. As a result, ACV cleanses the scalp of product build up (shampoo, deep conditioning, Hair butters, etc) and keep the scalp relieved of itching, dryness, etc.
ACV stimulates the shedding of dead skin cells from your scalp. ACV is said to have alpha-hydroxy acid which aids in exfoliating the scalp skin, getting rid of dead skin cells and preventing inflammation of the scalp which may further develop into numerous scalp problems as stated earlier.
How Can I Apply ACV to My Hair?
ACV can be applied to the hair in many ways but mostly not directly to the hair. This means ACV in its raw state cannot be applied to the hair but must be diluted or mixed with something before being applied to the hair. The most popular way of applying ACV on the natural hair is the ACV Rinse Method.
How To Do An ACV Rinse
There are various ways of doing the ACV Rinse Method but we’ll focus on the significant ones which benefit the hair most. Let’s take two main methods of ACV Rinse for our hair journey; the spraying method and the rinsing method.
First of all, measure about 60 ml of ACV in a container and add about 120 to 150 ml of room temperature water to it. Mix thoroughly and transfer into a spray bottle.
With the spraying method you’ll have to spray the ACV/Water mixture into your hair, let it sit for about 20 to 30 minutes and rinse it off.
The rinsing method, on the other hand, involves shampooing the hair, conditioning then rinsing your hair with the ACV/water mixture indicated above.
Must ACV Be Applied To The Hair Before or After Shampooing?
Well, ACV can be a substitute for shampoo. The only difference is that ACV does not lather due to lack of sulfates and it keeps oils and moisture locked into your hair for good.
Although ACV Rinse is not mandatory, it is necessary to do it after shampooing because whilst the shampoo attacks dirt and bacteria in the hair, it also leaves the hair cuticles open and messy. The conditioner applied afterwards is supposed to put the hair cuticles back in shape by flattening the cuticles and preventing the hair strands from rubbing against each other and tearing. However, many conditioners do not effectively play this role, so adding an ACV Rinse to your wash day routine aids the process by flattening the cuticles better than the conditioner would.
NB: You can have healthy hair without ACV but it is necessary to include it in your natural hair journey because it decreases risk of damage and/or slows the process of hair deterioration.
Where you have braids or locs, you can apply the spraying method and let it sit for about 30 minutes, rinse it off and dry the hair. This is highly recommended for itchy scalp associated with braids or locs.
It is crucially important to note that dry hair will do better with lesser amount of ACV whilst oily hair or problems with the scalp such as folliculitis, dandruff, itching etc, will do much better with a greater amount of ACV.
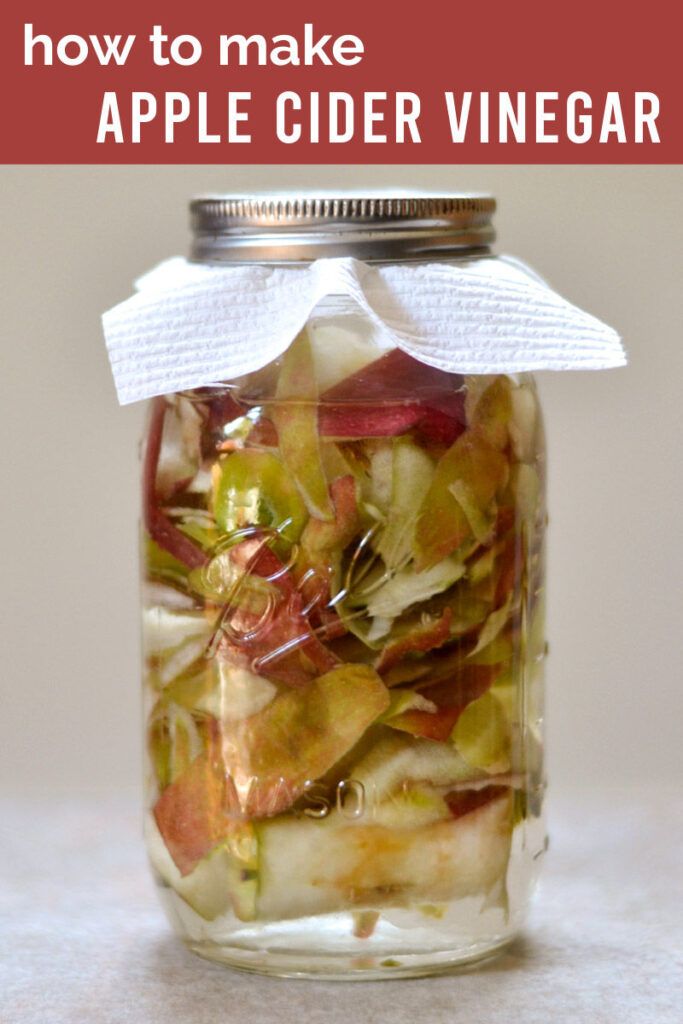
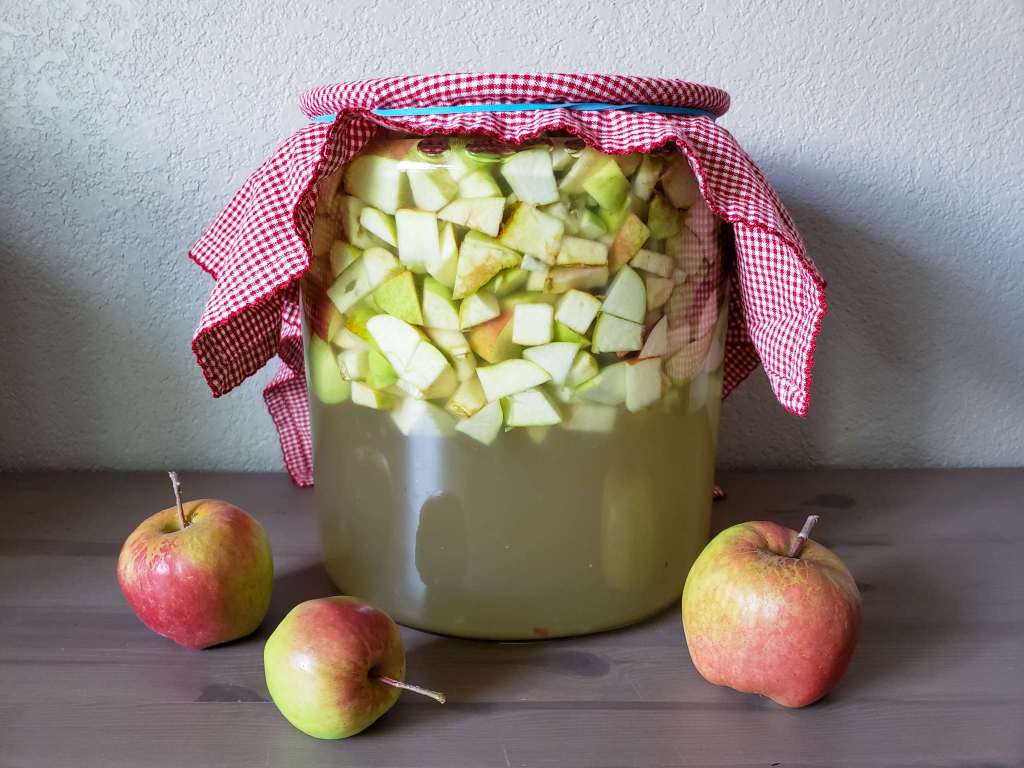
How Do I Prepare My Own ACV?
In the following paragraphs you’ll learn how to make your own ACV and also cut down cost but this method definitely will not save you enough time as you may wish. Let’s get right into it!
Required Ingredients:
1. Organic Apples
2. 1 Cup purified/distilled water
3. 1 tbsp sugar (natural)
NB: The ratio in making ACV is 1 Apple: 1 Cup Water: 1 tbsp Sugar. However, you may multiply or divide to suit the amount you desire.
Equipment Needed:
1. Glass Jar/ glass bowl/ glass cup
2. Spoon/ Spatula
3. Yarn/Rubber band
4. Chiffon cloth (breathable/ air must be able to penetrate through)
5. Strainer
6. Funnel
Method:
1. Add sugar into water in a glass cup or bowl and set aside.
2. While waiting for sugar to dissolve in the water, dice apples and pour into the sugar/ water mixture.
3. Transfer it into the glass jar and stir thoroughly with spoon or spatula for a few seconds.
4. Cover with chiffon cloth and tie it tightly to the jar with rubber band or yarn.
5. Leave it to sit at a cool place for 6 weeks but stir for 30 seconds each day for the first 10 to 12 days to prevent the apples on the surface of the solution from drying.
6. After 6 weeks, strain the solution with a plastic strainer and plastic funnel into a glass container.
Breathable cloth tied tightly to glassjarwith rubber band.
One may wonder why sugar is used in making ACV. Well, the bacteria must feed on the sugar for the fermentation process to occur for effective and quicker results.
Do not use any metal equipment in this process as the metal reacts with the chemical compound of the ACV.
So we’re through with ACV, and why every natural needs it to enrich their hair journey. ACV is very essential in our natural hair journey due to its super fantastic properties, but as said earlier, it’s not mandatory but very necessary in your hair journey. You may include it in your wash day or treatment routines and girl, you’re gone thank me later. Hope you find ACV friendly enough and this article useful as well to your hair journey.
Thank you for being a part of us by perusing through this article. Any comment or question is duly welcome. Wish you the best of luck in your natural hair journey. See ya in the next blog!
Chaque naturel bouclé aime que ses bords soient détendus et fermes, mais la plupart d’entre nous trouvent qu’il est difficile d’obtenir les bons gels ou crèmes de pose de bords pour nos cheveux. C’est parce que de nombreux produits sur le marché ne fonctionnent tout simplement pas pour nous comme prévu. Ouf ! Que pouvons-nous faire à ce sujet alors?
Dans cet article, divers gels et leurs avis individuels seront discutés en détail. Nous allons plonger dans les avantages et les inconvénients de chaque gel, quand et quand ne pas l’utiliser et le meilleur en fonction de votre type de cheveux en termes de pose de vos bords sans aucun problème. Alors commençons.
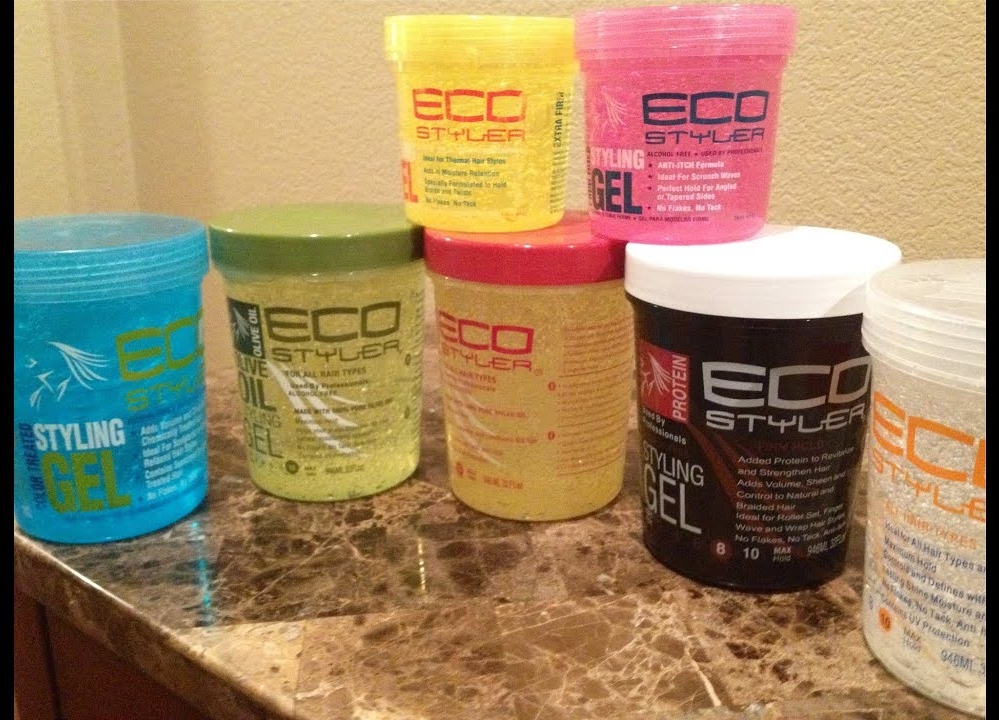
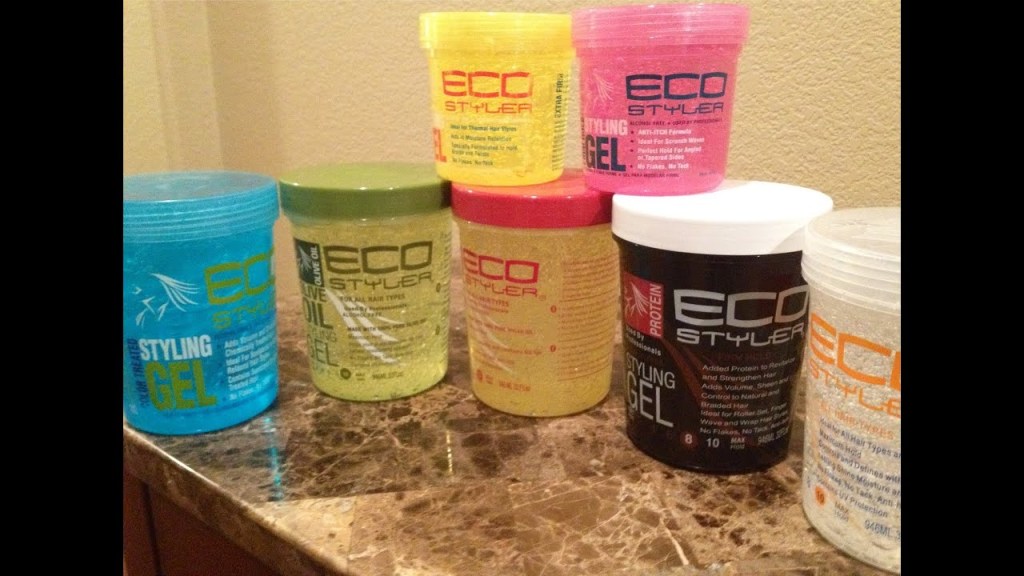
Le premier gel à regarder est l’Eco Styler Gel
Leconfield Styler Gel est un gel à base d’eau qui est souvent utilisé pour coiffer ou presser les cheveux. Il existe de nombreux types. Par exemple. huile d’argan, noix de coco, huile d’olive, etc. En raison de sa propriété à base d’eau, il convient mieux aux cheveux de type 4a et 4b et définit parfaitement les boucles. Il est fortement recommandé pour le wash and go (spécifiquement les cheveux de type 4a/4b). Eco gel sèche rapidement et ne fonctionne pas mieux sur les cheveux de type 4c, surtout lorsque les cheveux sont rêches et très épais. Il est parfait pour les coiffures lisses (tous types de cheveux) et ne s’écaille pas facilement. Lorsque vos cheveux sont très épais, ce gel n’est pas le meilleur pour poser vos bords.
Astuce : Les cheveux doivent être correctement hydratés avant d’appliquer le gel. Cela réduit la desquamation précoce.
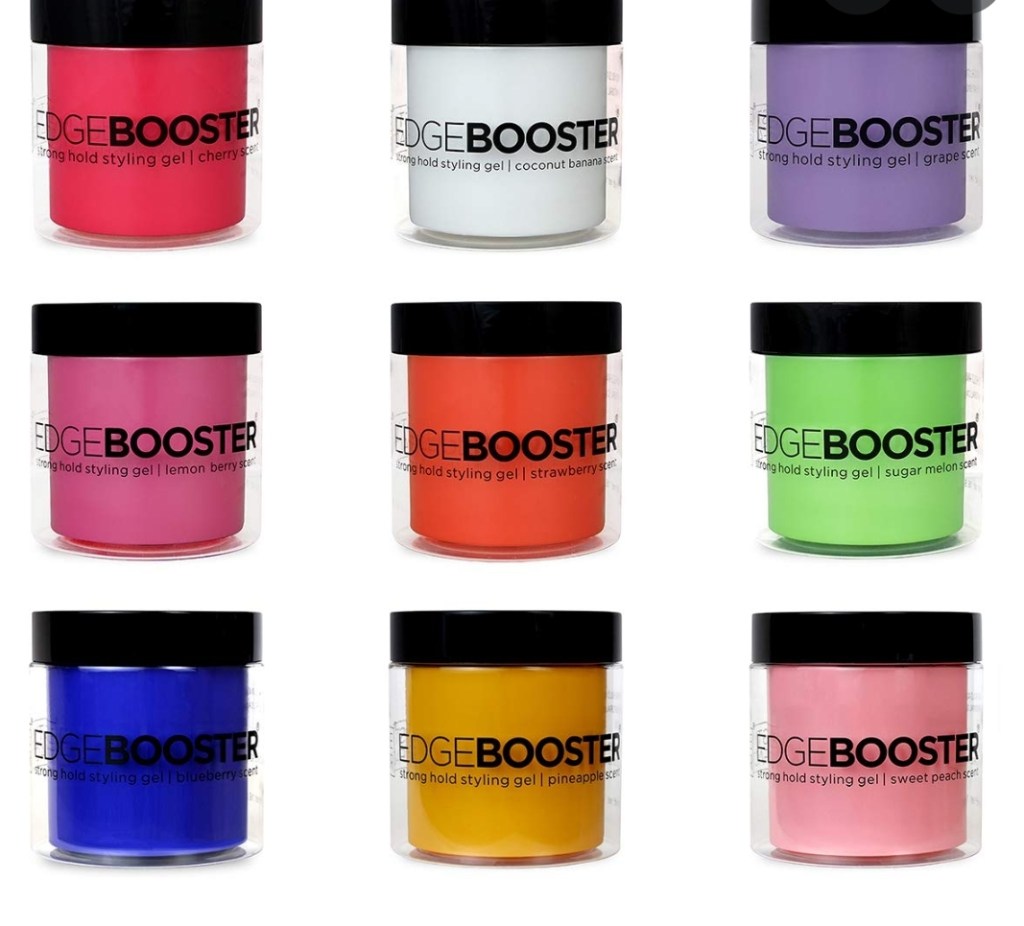
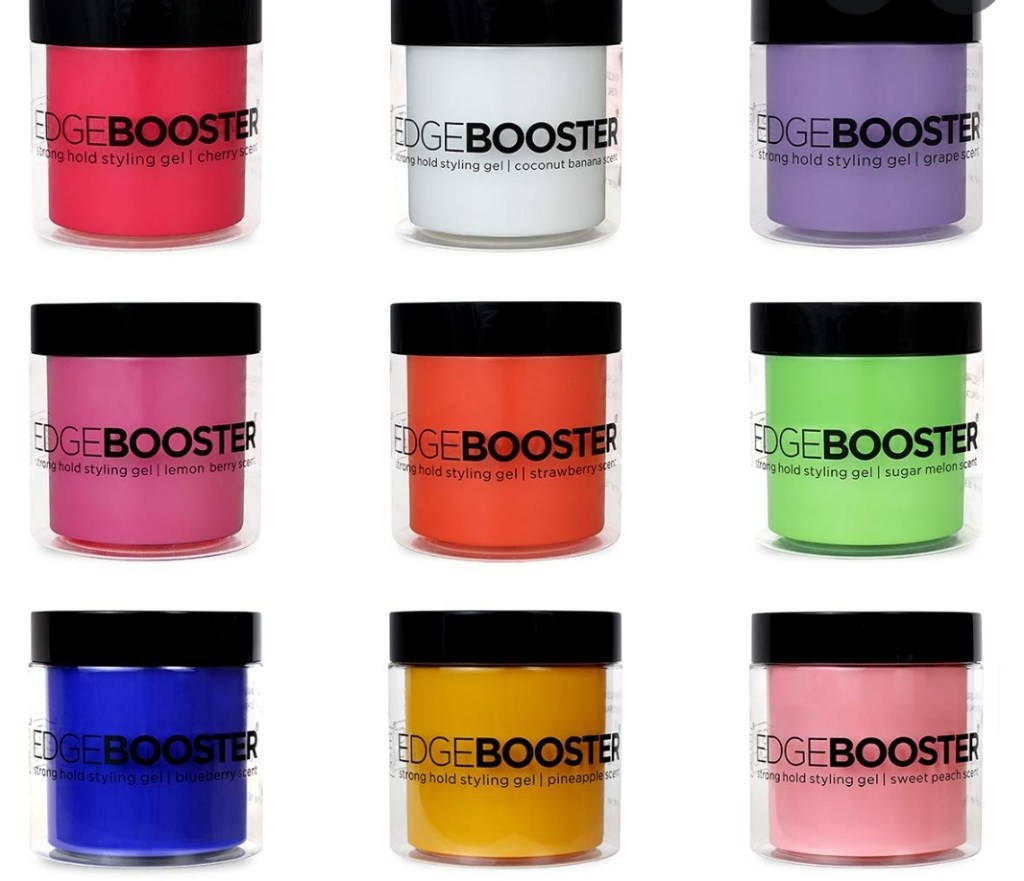
Notre prochain gel à regarder est Style Factor Edge Booster Gel.
Contrairement à l’Eco Styler Gel, ce gel donne une meilleure et plus longue tenue aux cheveux et ne s’écaille pas rapidement. Il peut tenir environ cinq (5) à six (6) jours avant même de s’écailler. Il existe également de nombreux types et parfums tels que le parfum d’ananas, le parfum de fraise, le parfum de raisin, etc. Ce gel peut également être utilisé pour poser des bords, mais ne conviendra pas mieux aux cheveux épais.
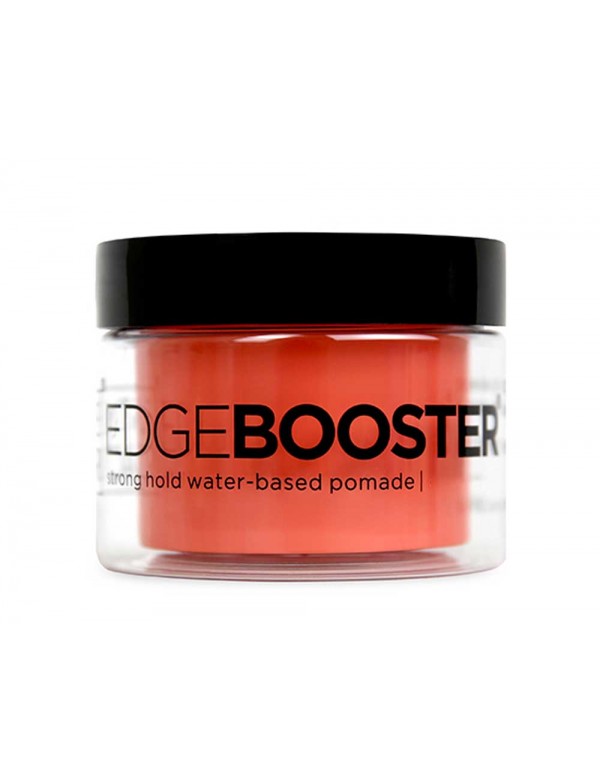
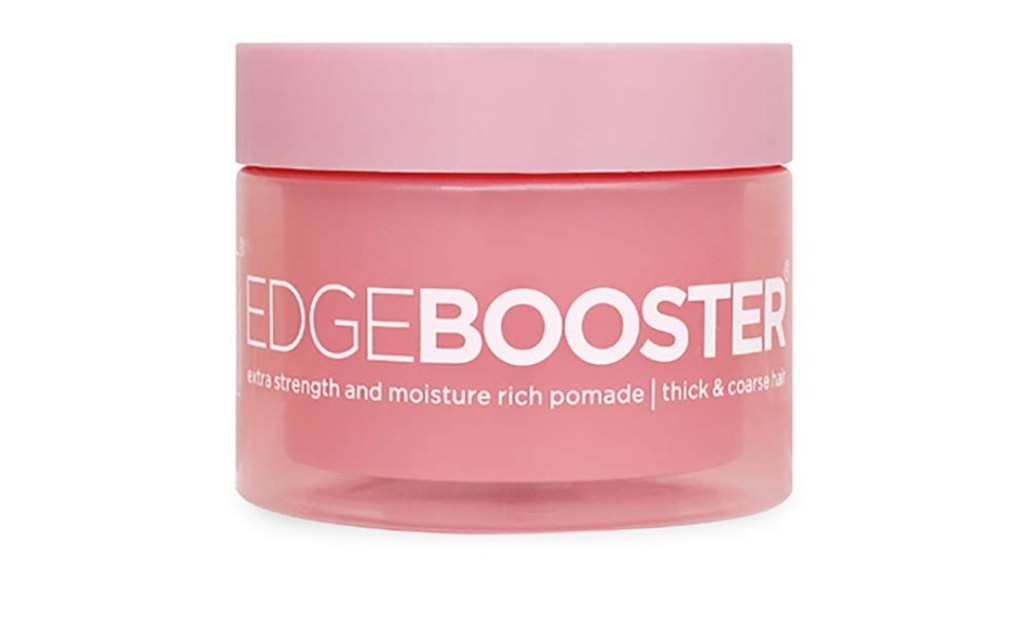
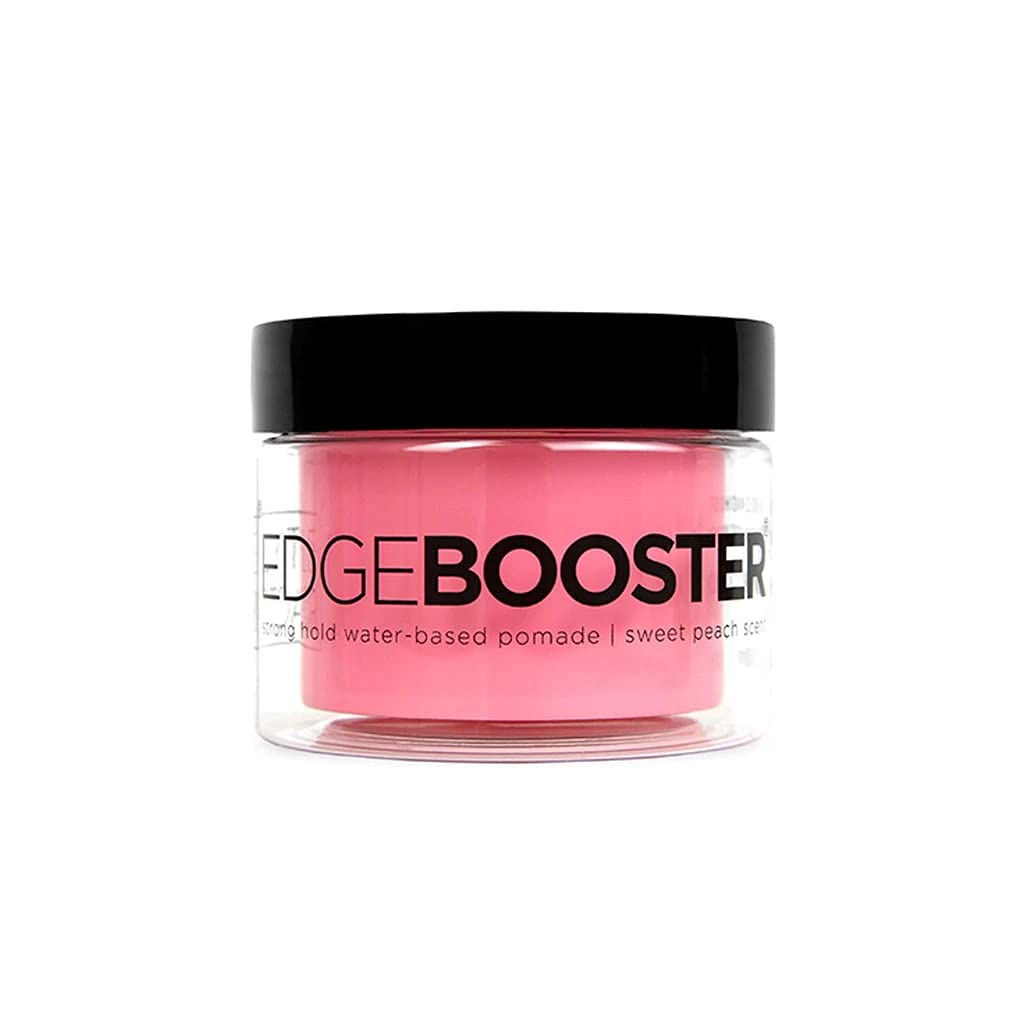
La troisième est la pommade Style Factor Edge Booster.
Il s’agit d’une pommade de contrôle des bords qui aide à détendre et à maintenir les bords de manière constante. Il est différent du Edge Booster Gel qui est à usage général. Il peut être appliqué sur cheveux humides ou secs et se décline en plusieurs parfums. Par exemple. Parfum de pêche sucrée, parfum de bonbon au citron, noix de coco, etc. Il donne une tenue supplémentaire à vos bords et chaque type a une odeur unique que toutes les filles adoreront❤.
Si vos cheveux sont extrêmement durs et épais et qu’il est difficile de poser vos bords, vous pouvez envisager d’utiliser le type ci-dessous.
Cependant, cette pommade en général peut laisser un résidu blanchâtre sur vos bords.
Astuce : vous pouvez envisager de mélanger avec un gel de consistance légère pour réduire les résidus blanchâtres.
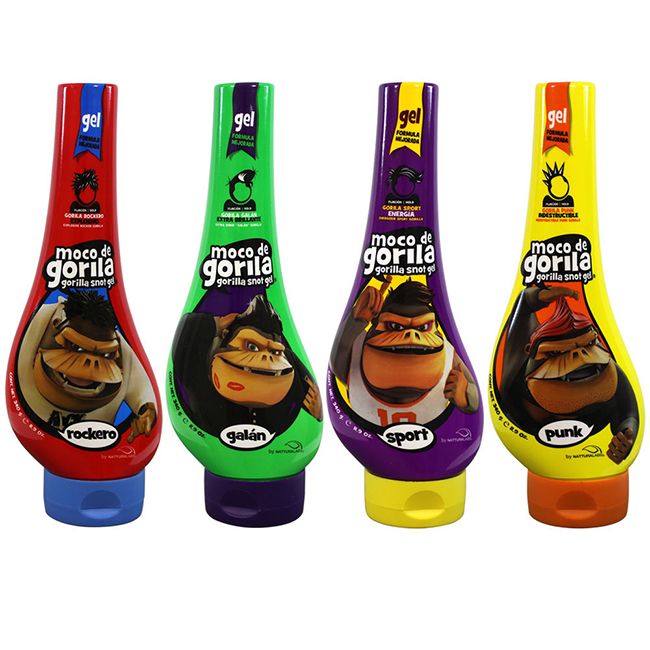
Le dernier gel dont il faut parler est le Gorilla Snot Gel.
Il s’agit d’un gel épais et collant qui est populairement connu pour sa tenue ferme, appropriée et durable des bords ou des cheveux naturels en général. Il existe quatre types principaux qui sont le Punk (jaune), le Rocker (rouge), le Galan (vert) et le Sports Energiser (violet) avec des facteurs de maintien de 10, 9, 8 et 10 respectivement. Vous pouvez envisager d’en utiliser en fonction de votre type de cheveux et de vos préférences.
Ce produit est fortement recommandé par les produits naturels, en particulier ceux qui ont les cheveux plus épais et plus grossiers. Il est parfait pour les cheveux très épais et rêches. Il est plus collant que les autres gels et plus ferme et ne s’écaille pas facilement.
Ce gel définit également assez bien les boucles en le frottant dans votre paume et en peignant vos cheveux avec les doigts.
Cependant, Gorilla Snot Gel contient un pourcentage d’alcool et d’autres produits chimiques qui peuvent dessécher vos cheveux après une utilisation constante. Le Punk rend les cheveux jaunâtres lorsqu’il est utilisé intensivement et tous les types de ce gel peuvent provoquer une perte de poils frontaux ou des cheveux cassants après une utilisation constante ou lorsqu’ils sont utilisés intensivement.
Astuce : appliquez toujours une crème hydratante à base d’eau ou des huiles ou beurres naturels comme l’huile de noix de coco, l’huile de jojoba, le beurre de karité, l’huile d’avocat, la vaseline (arôme d’aloès), etc.
Nous avons donc traité en détail ces quatre gels, leurs critiques, leurs avantages et leurs inconvénients et leur utilisation. J’espère que vous trouverez cela utile et perspicace. Nous plongerons plus profondément dans d’autres produits capillaires et gels au fil du temps.
Merci beaucoup de faire partie de cette noble communauté. Nous sommes impatients de vous voir plus souvent et d’interagir avec vous également. Si vous souhaitez partager des suggestions ou poser des questions, faites-le nous savoir dans la section commentaires.
CNC : PASSEZ AU NATUREL, RESTEZ NATUREL, SOYEZ NATUREL !
Every curly natural loves to get her edges relaxed and firm but most of us find it challenging to get the right edge laying gels or creams for our hair. This is because many products on the market just don’t work for us as expected. Wheeww! What can we do about it then?
In this article, various gels and their individual reviews will be discussed in detail. We will dive into the pros and cons of each gel, when and when not to use it and the best one to suit your hair type in terms of laying your edges without any trouble. So let’s get started😊
The first gel to look at is the Eco Styler Gel.
Eco gel is a water based gel which is often used for styling or pressing down hair. It comes in many types. Eg. argan oil, coconut, olive oil, etc. Due to its water based property it works best for type 4a and 4b hair and defines curls perfectly. It’s highly recommended for wash and go (specifically type 4a/4b hair). Eco gel dries quickly and does not work best on type 4c hair, especially when the hair is coarse and very thick. It is perfect for sleek down hairstyles (all hair types) and does not flake easily. When your hair is very thick, this gel is not the best for laying your edges.
Tip: Hair must be moisturised properly before applying gel. This reduces early flaking.
Our next gel to look at is the Style Factor Edge Booster Styling Gel.
Unlike the Eco Styler Gel, this gel gives a better and longer hold to the hair and does not flake quickly. It can hold for about five(5) to six(6) days even before flaking. It also comes in many types and scents such as pineapple scent, strawberry scent, grape scent, etc. This gel can be used to lay edges too, but will not best suit thick hair.
Third is the Style Factor Edge Booster pomade.
This is a stronghold edge control pomade which aids in relaxing and holding edges steadily. It is different from the Edge Booster Gel which is for general use. It can be applied to damp or dry hair and it comes in many scents. Eg. Sweet peach scent, lemon candy scent, coconut, etc. It gives extra hold to your edges and each type has a unique smell every girl will love❤.
If your hair is extremely hard and thick and find it difficult to lay your edges, you may consider using the type below.
However, this pomade in general may leave a whitish residue on your edges.
Tip: You may consider mixing with a lightweight consistency Gel to reduce the whitish residue.
The final gel to talk about is the Gorilla Snot Gel.
This is a thick and sticky gel which is popularly known for it’s firm, proper and long-lasting hold of edges or natural hair in general. It comes in four main types which are the Punk(yellow), Rocker(red), Galan(green) and SportsEnergiser(purple) with hold factors of 10, 9, 8 and 10 respectively. You may consider using any depending on your hair type and preference.
This gel is highly recommended by naturals in terms of laying perfect edges (especially with thicker and coarser hair). Interestingly, this gel is perfect for very thick and coarse hair. It is also stickier and firmer than other gels and does not flake easily.
This gel also defines curls pretty well by rubbing it in your palm and combing through your hair with fingers.
However, Gorilla Snot Gel has a percentage of alcohol and other chemicals in it which may dry out your hair after constant use. The Punk makes the hair yellowish when used heavily and all the types of this gel can cause loss of frontal hairs or hair breakage after constant use or when used heavily.
Tip: Before using this gel, always apply a water based moisturizer or natural oils or butters like coconut oil, jojoba oil, shea butter, avocado oil, vaseline (aloe flavour), etc, to prevent or reduce drying of the hair.
So we have thoroughly dealt with these four gels, their reviews, pros and cons, and usage. Hope you find this helpful and insightful. We will dive deeper into other hair products and gels as time goes on.
Thank you so much for being a part of this noble community. We look forward to seeing you more often and interacting with you as well. If you wish to share any suggestions or ask questions, let us know in the comments section.
Natural hair is one section of life that many black girls adore but fear to flaunt due to societal criticisms, racism, difficulty in handling natural hair, low self esteem, bullying, myths, etc.
Some natural hair myths are as follows: it’s difficult to keep, natural hair doesn’t grow well, it is very messy, it’s old fashioned, it’s complicated, and many more.
I want to encourage you as well as give you many reasons to embrace your natural hair.
First of, it’s very authentic and many other races wish they had those curly definitions. Why do some races curl their hair so often? They love the curls!!! And you have it for free, why not embrace it??
Also, your natural hair makes you stand out. Girl, your hair is your pride! It makes you beautiful, it makes you confident, it makes you antique. Imagine flaunting your well kept and treated hair and everyone around just wishes to have that bouncy natural fluffy hair. What a natural wonder!
Your hair also makes you proudly black. Black is pride, black is golden, black is treasure. Girl, show the world those curls ain’t just curls, they’re your strength, they’re your identity, they’re your lineage. Black is confidence, fortitude and passion. You’re in love with your hair, your lineage, your family tree, your truest identity. Prove to them you ain’t ashamed of those wonderfully made curls and coils on top of your head.